Stay safe.
Wednesday 11 November 2020
Friday 16 August 2013
Summer progress
I've had a full summer, so the bike has plodded along slowly.
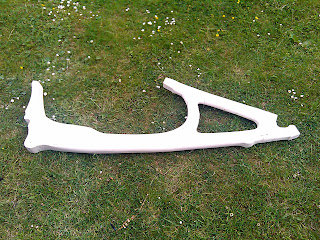
The foam core has been covered with one layer of glass. This stabilised the foam, and while it still isn't anywhere near strong enough, the foam can now survive the odd knock or two.
Next, holes were cut in the frame to accept the hard points for the suspension, pedals and steering. These were aligned carefully and set into place using automotive body filler. Surplus filler was ground down before another piece of glass was laid around them.
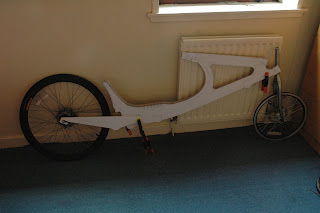
The swingarm is still wooden, but will be reinforced with carbon. So now I've got something that is actually starting to look like a bike. Tonight I assembled the major components to see how they look together.
 Well the rear end is at the correct height, thanks to the lump of wood shoved in where the shock absorber should live. The swingarm is still two lumps of wood and relies on the back axle to hold them together. The swingarm shock mount is next on the list. The bottom bracket is actually a bb30 bottom bracket adaptor, which was an ebay find. This was easier than getting a framebuilder to supply me with a tube with the appropriate thread. The head tube is at the correct angle, although for the purpose of this demonstration I have left out part of the headset assembly.
More will follow...
The foam core has been covered with one layer of glass. This stabilised the foam, and while it still isn't anywhere near strong enough, the foam can now survive the odd knock or two.
Next, holes were cut in the frame to accept the hard points for the suspension, pedals and steering. These were aligned carefully and set into place using automotive body filler. Surplus filler was ground down before another piece of glass was laid around them.
The swingarm is still wooden, but will be reinforced with carbon. So now I've got something that is actually starting to look like a bike. Tonight I assembled the major components to see how they look together.

More will follow...
Thursday 4 July 2013
Frame and Steering Progress
This was always going to be a slow build, but I'm in no hurry.
So, having realised that genuine fibreglass core materials were going to be on the expensive side, I bought four sheets of 1200x450x50mm cavity wall insulation for £20 all in. Having extended the frame templates by 15cm to give me a bit of leg room, this meant the templates overhang the end of the foam sheets. no problem, as there's plenty of scrap foam so I stuck some of the scrap on at the front with the glue gun. This turned out to be a small error, as hot melt glue doesn't sand very well, so I've got a bit of a lump in the frame. This is being rectified with a sharp blade, and by the time it's covered in epoxy, you'll not notice it's there.
After a lot of cutting I was left with a bin bag full of random offcuts, which I'm not wanting to throw out yet. I also had something resembling a Groundhugger frame, at least in profile.
The core of the frame needs to be 68mm wide at the rear, tapering off to the front. the black lines are a guide for me to start sculpting this down. Using a hacksaw blade, a surform file and a length of M8 threaded rod for fine detail sanding, I turned this block of foam into three carrier bags full of fine white dust and the foam core for the frame.
 With apologies for the bleached out picture - the phone camera is OK. Just OK. There's a couple of bits still look a wee bit rough, but I'll be dealing with them before the fibreglass goes on. One thing I have already done is to mix a small bit of resin, just to make sure the foam won't melt. It's OK.
The disadvantage of using insulating foam instead of other core materials, at least as far as I can see is the occasional void in the foam. They aren't too large, but I would imagine f you were doing anything more detailed, they may present a problem.
Now the steering.
The original Groundhugger design calls for a universal joint at the head of the steering tube. I just don't have the facilities to engineer something like that, and I'm concerned that this could lead to play in the steering that I'm unable to correct for. Instead I'm going to use a linkage from the top of the headset up to a set of handlebars in the "cockpit" and use traditional push-pull bars.
I have a threadless headset stem that allowed me to clamp in two 28mm diameter bearings. These will take an 8mm bolt attached to a pair of metal brackets which are in turn attached to the frame.
Both brackets are the same length. Perspective is making them look different.
That's all for the moment. Next step is to wrap the frame in a single layer of glassfibre before starting to add carbon.
So, having realised that genuine fibreglass core materials were going to be on the expensive side, I bought four sheets of 1200x450x50mm cavity wall insulation for £20 all in. Having extended the frame templates by 15cm to give me a bit of leg room, this meant the templates overhang the end of the foam sheets. no problem, as there's plenty of scrap foam so I stuck some of the scrap on at the front with the glue gun. This turned out to be a small error, as hot melt glue doesn't sand very well, so I've got a bit of a lump in the frame. This is being rectified with a sharp blade, and by the time it's covered in epoxy, you'll not notice it's there.
 |
| Template on top of insulation board. |
 |
| Frame blank, awaiting sanding. |

The disadvantage of using insulating foam instead of other core materials, at least as far as I can see is the occasional void in the foam. They aren't too large, but I would imagine f you were doing anything more detailed, they may present a problem.
Now the steering.
The original Groundhugger design calls for a universal joint at the head of the steering tube. I just don't have the facilities to engineer something like that, and I'm concerned that this could lead to play in the steering that I'm unable to correct for. Instead I'm going to use a linkage from the top of the headset up to a set of handlebars in the "cockpit" and use traditional push-pull bars.
I have a threadless headset stem that allowed me to clamp in two 28mm diameter bearings. These will take an 8mm bolt attached to a pair of metal brackets which are in turn attached to the frame.
 |
| Rough design with completed brackets. |
 |
| Brackets with bearings. Bolts need shortened and the nuts will be Nyloc. There's a washer missing as well. |
 | ||
| Completed bracket and steering stem. |
That's all for the moment. Next step is to wrap the frame in a single layer of glassfibre before starting to add carbon.
Sunday 12 May 2013
Construction begins
in my last post i said I had begin cutting the templates for the chain stays. The original XR2 design calls for these to be made from aluminium, and while it's possible for me to do this, I had thought about making them out of carbon. My thought was to make a plywood and balsa former that was to be wrapped in carbon. But when i started cutting the wood, I realised what a nice bit of wood I had. It's 6mm modeling plywood, birch I think. So by way of an experiment I'm going to attempt a wooden swingarm.
I've deviated from the original design again... The original XR2 has a chain wheel in the middle of the bike, so the right chainstay is set in behind the sprocket, and above the bottom bracket. As I'm dispensing with this sprocket, I've made the chainstays symetrical. As a result, I can make a jig and use it to form both sides.
In order to stop the rear wheel rotating and stopping the roller brake from working, I've recessed some lumps of metal into my chainstays. The epoxy is curing on these just now. The plan is to add a couple of layers of ply to the chainstays, then join them together in the middle to take the suspension pivot. I'll be adding a few layers of varnish to lift the colour of the plywood. This is an experiment, so I'll see how it goes.
Of course, now I have chainstay and frame templates made up, I had to make a mockup using the other components, clamps and imagination. Ignore the headtube height and angle - that's the angle it wanted to wedge itself in at.

Saturday 4 May 2013
Re-Cycling
The other day I visited The Bike Station in Edinburgh. It's a project that takes old bikes, refurbishes them and sells them on, with the surplus cash being used to support cycling initiatives. As a result of thework they do, they have piles of old bike parts for the homebuilder to buy. After being welcomed from one f the staff, he pointed me towards a wall of filing cabinets full of every part imaginable.
I came away with handlebars, 2 stems, and a set of pedals, but I was still short of a 20" disc wheel and a head tube. After speaking with a member of staff, I was taken up to the warehouse, where all the bikes that are being sorted live. As luck would have it, when I went in,I spotted a 20" wheel with a disc hub. It's not a great brand of wheel, but it runs true and the bearings are sound. As for the head tube, I was hoping they would have a damaged frame that I could have taken an angle grinder to. No such luck. The only frame they had that could be considered an appropriate write off had an oversized head tube (1.5"?). It looked like the former owner had cross threaded the bottom bracket shell and mangled the threads. It was a shame, as it was an exceptionally light frame that was once a very good bike.
there were a couple of othr things was after, but it was goingto be unlikely I would have found a headset and a bottom bracket. These will either stay with the bikes to be recycled, or be in such a poor condition that they are not worth recycling.
I did see a trigger shifter for my Nexus hub,but it looked like it had been harvested for parts, so I decided against it.
So for the bars, stems, pedals and wheel, I paid £15. I woud have been a lot more on Ebay. And I got a new bottom bracket from another bike shop for £20. I was happy buying new, as I know this gets a lot of abuse.
I also visited Laid Back Bikes in Edinburgh to discuss chain and seat options. While I'm planning on building the genuine XR2 seat, there was some nice upholstery on display that cuold be modified to fit my bike. If comfort becomes an issue, then I may consider a change. As for chain, I'm probably better just buying standard chain lengths and joining them with powerlinks.
On the construction front, I've started cutting templates for the chainstays.
Tuesday 23 April 2013
Groundhugger Spotted in the Wild
Newly released spy footage shows a Groundhugger XR2 in it's natural environment.
Thanks to David Wolfe for the video and for the construction tips. That's him piloting his own XR2 in the video. His construction diary is here.
In other news, with the assistance of Mrs G, I removed the internals of my Nexus 8 hub, gave them a spit and a polish and put them back together. The dropouts on my mountain bike were long enough for me to be able to get the hub in and tested, albeit without a functioning back brake. The hub appears to work fine, gear selection is painless, and there's no drag from the back end. I'm now confident in using this in my final bike.
I'm keeping an eye on Ebay for some of the other components I'll require. I'm also planning a trip to my local bike recycler to have a rummage through their parts bin
Sunday 7 April 2013
Drivetrain
I won a Shimano Nexus 8 speed hub on Ebay the other day. This was a bit of a gamble, as the seller said that the hub was stuck in gear. Well I was bidding against someone, so if the thing was unfixable, I could always get most of my money back.
Using the very useful site SheldonBrown.com I found instructions for stripping the hub, which is something you just don't want to do. These things are complicated. I was also fortunate that the seller included parts from a damaged hub so I could see some of the affected components.
So it turned out that the gear selector cable connects to a cog. The cog connects to two prongs that stick out the side of the hub. Except the prongs were not sticking out the sude, instead they were flush with the ball race.
What appears to have happened is the non drive side bearings have been tightened up too much, probably through the cup and cone being too tight. This has the effect of opening up the bearing on the drive side and drawing the gear selector pins inside the body. So I released the non drive side nuts a couple of turns, and gave the drive side a very gentle tap with a hammer. A little bit of persuasion later and the hub appears to select gears, but I'm not going to know for sure until I test it in a bike frame.
While the combination of hub gear and drum brake makes for a heavy back end, I've now got a set of gears with no overlap, and I don't need to worry about derailleurs. Also the rear swingarm will only require pretty standard dropouts.
Saturday 30 March 2013
Early Stages
This week I went to my local printers so I could get paper copies of the plans drawn up. The plans CD contains 14 plans of 34x22in, plus one full size plan of the main frame assembly. This is the point that the bike went from being something that exists only on the computer to something that I'm actually attempting to build. I had one copy of each of the plans printed, plus three copies of the main frame plan. Some of the plans I may not use, as this version is unlikely to have electrical assistance. Still, it's good to have options, and I'm thinking of using the battery rack as the basis for a luggage rack. And the mid frame battery box, which is a clever design in its own right, may become a toolbox.
The instructions advise you to create a pair of templates for the foam core from the larger plan, using a sheet of 3mm hardboard. My local B&Q has an offcuts bin beside their wood cutting section, and they had a lump of MDF that appeared to have been partially printed as a bit of laminate flooring. This cost a princely £1.50 so I wasn't complaining.
With the assistance of Mrs G, two of the plans were cut up and stuck to the MDF. Now I need to cut them out. There's no rush, as I've not got foam to cut out yet, or any of the multitude of parts I require.
So it's a start, if only a small one. This isn't going to be a rush job.
 |
| Looks like it's going to fit |
Subscribe to:
Posts (Atom)